
Order
to Cash (O2C) Cycle / Process – Oracle R12
Oracle apps Techno Functional......
Functional or End User Training Materials.

Order to Cash Cycle(Process)
steps can be listed as below:
1.
Enter the sales order
2.
Book the sales order
3.
Launch Pick Release
4.
Pick Confirm (Move
order)
5.
Ship confirm
6.
Create Invoice
7.
Create Receipt
8.
Transfer to General
ledger
9.
Journal import
10.
journal posting
Enter
the Sales Order:
Navigation: Order Management Super User ->Orders, Returns
-> Sales Orders ->
Steps: 1.
Steps: 2.

Steps: 3.

Navigation: Order Management Super User ->Orders, Returns
-> Sales Orders ->
Enter the Customer
details (Ship to and Bill to address), Order type, Price List, Salesperson.

Steps: 4.
Go to “Others” Tab and Enter the Payment Terms, Sales Channel, Warehouse.

Steps: 5.
Then
go to “Line Items” Tab and Enter the Ordered Item, the
quantity required.
You can check if the item to be ordered is
available in the Inventory by clicking on Availability Button.
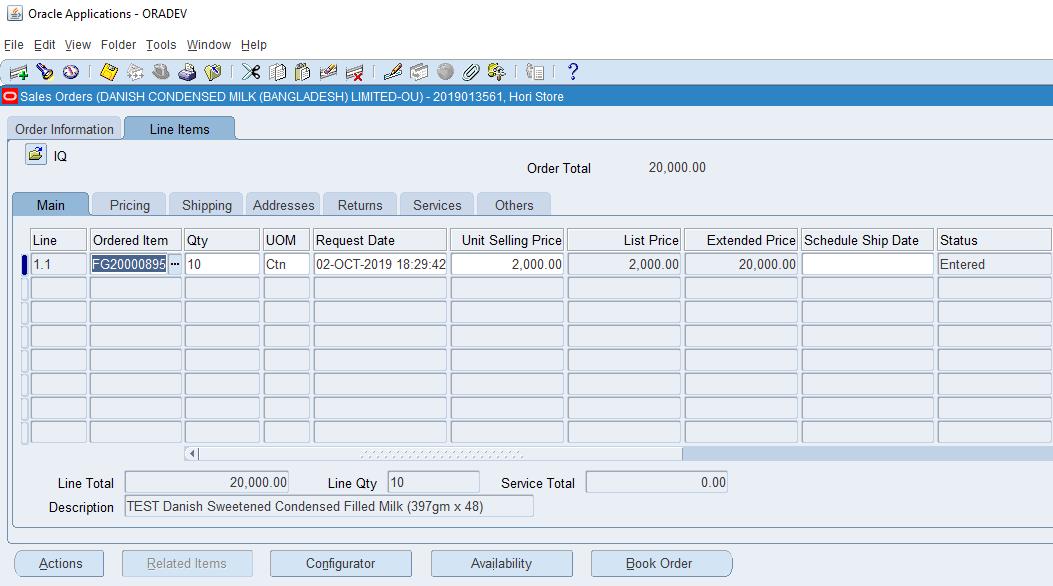
Then
Save the work.
In
Oracle, Order information is maintained at the header and line level.
Check
the back end tables
1.
OE_ORDER_HEADERS_ALL
Flow_status_code = Entered
2.
OE_ORDER_LINES_ALL
Flow_status_code = Entered
The header information is stored in OE_ORDER_HEADERS_ALL and the
line information in OE_ORDER_LINES_ALL when the order is entered.
Book the Sales Order:
Book
the Order by clicking on the “Book Order” button down the sales order screen.
Now
that the Order is BOOKED, the Sales order status on the header is change accordingly
“Booked”.
1.
Check
the back end tables
1.
OE_ORDER_HEADERS_ALL
Flow_status_code = Booked
2.
OE_ORDER_LINES_ALL
(Flow_status_code = Awaiting shipping)
Record(s) will be created in the table
WSH_DELIVERY_DETAILS with Also Record(s) will be
inserted into WSH_DELIVERY_ASSIGNMENTS. At the same time DEMAND INTERFACE
PROGRAM runs in the background and inserts into MTL_DEMAND
3.
WSH_DELIVERY_DETAILS
RELEASED_STATUS= 'R' (ready to release)
4.
WSH_DELIVERY_ASSIGNMENTS
new row inserted
2.
Backgroud
programs
DEMAND INTERFACE PROGRAM
Steps: 6.
Launch Pick
Release:
Navigation: Shipping
-> Release Sales Order - > Release
Sales Orders.
search sales order -> Pick release process
completes successfully.
If Autocreate Delivery is set to ‘Yes’ then a new record is
created in the table WSH_NEW_DELIVERIES.
Back
end tables
1.
WSH_NEW_DELIVERIES
( NEW ROW CREATED)
2.
WSH_DELIVERY_DETAILS
1.
( if Auto pick confirm
= y )
RELEASED_STATUS= 'S' (Release to warehouse)
Steps: 7.

Steps: 8.

Steps: 9.

Steps: 10.

Pick
Confirm the Order: (Move order )
Navigation: Inventory Super User -> Move Order ->
Transact Move Order
Search
with Move Order Number.
1.
click 'view update
allocation ' if needed -> click Transact button >
Transact button will be deactivated
Steps: 11.

Steps: 12.

Close Transact move order form then
Steps: 13.
1.
Go to order
organizer form -> search SO number -> additional info ->
deliveries tab > pick status > Staged / Pick confirm
2.
-> view delivery details button -> Delivery
line details button ->
1.
Line status : Staged
/ Pick confirm
2.
Next step field
value : ship confirm

Ship Confirm the
Order:
Navigation: Order
Management Super User>Shipping >Transactions.
Query
with the Order Number.
Click on Delivery tab shows > click Ship confirm button
1.
Enable following
: Yes
1.
Ship entered qty
:
2.
Create delivery for
staged quantities : yes
3.
Set delivery in
transit : yes
4.
Create bill of
lading : yes
5.
Close trip: yes
2.
Get a message saying :
Delivery was successfully confirmed
Steps: 14.

Steps: 15.

Steps: 16.

Ship
confirm will call other programs like, in Run -> View request
INTERFACE TRIP Stop, Commercial Invoice, Packing Slip Report, Bill
of Lading
1.
Back
end tables
1.
WSH_DELIVERY_DETAILS
(RELEASE STATUS = C
(means Ship confirm))
2.
OE_ORDER_LINES_ALL
(Flow status code =
shipped)
3.
MTL_RESERVATIONS(
INVENTORY_ITEM_ID = 'item' => table empty > data freezed)\
4.
MTL_ONHAND_QUANTITIES_DETAIL(for
item 'item' reduces by qty of SO)
5.
MTL_MATERIAL_TRANSACTIONS(
for inventory item id > will show 4 rows
1.
look at transaction
qty column
1.
1
row for adding items
2.
1
row > release from Inventory
3.
1
for moving to staging area
4.
1
row > staging to transportation
SO INTERFACE
1.
Order organizer ->
SO -> additional info -> deliveries -> view delivery details ->
1.
Line status >
interfaced
2.
next step field
: Not applicable
2.
RA_INTERFACE_LINES_ALL
: (INTERFACE_LINE_ATTRIBUTE1 = SO NUMBER)
1.
Now shipping status
will be interfaced
Steps: 17.

Steps: 18. Sales Order
Reports:

Steps: 19. Delivery Challan
Reports:

Create Invoice:
Run
workflow background Process.
Navigation: Order
Management >view >Requests
1.
item type : OM
standard
2.
process deferred : yes
3.
Process time out : Yes
Workflow
Background Process inserts the records
RA_INTERFACE_LINES_ALL with
INTERFACE_LINE_CONTEXT
= ‘ORDER ENTRY’
INTERFACE_LINE_ATTRIBUTE1=
Order_number
INTERFACE_LINE_ATTRIBUTE3=
Delivery_id
Go to Navigation: Receivables Super User> Transactions> Transactions form
Auto invoice Master Program and Auto invoice import program which
creates Invoice for that particular Order.
Query with the Order Number as Reference.
Steps: 20.

Steps: 21.

Steps: 22.

Steps: 23.

Go to Navigation: Receivables Super User> Transactions> Transactions form
Query the invoice using SO in 'Reference' field
Back
end tables
1.
RA_CUSTOMER_TRX_ALL will have the Invoice header information. The
column INTERFACE_HEADER_ATTRIBUTE1 will have the Order Number.
2.
RA_CUSTOMER_TRX_LINES_ALL will have the Invoice lines information.
The column INTERFACE_LINE_ATTRIBUTE1 will have the Order Number.
3. Create accounting - SLA
1.
XLA_EVENTS (where
EVENT_ID =xx)
2.
XLA_AE_HEADERS (where
EVENT_ID = XX)
3.
XLA_AE_LINES (where
AE_HEADER_ID = XX)
Steps: 24.

Steps: 25.

Steps: 26.

Create receipt:
Navigation: Receivables>
Receipts> Receipts
Enter
the information.
Steps: 27.

Click on Apply Button to apply it to the Invoice.
Back
end tables
AR_CASH_RECEIPTS_ALL
Steps: 28.

Steps: 29.

Steps: 30.

Transfer to
General Ledger:
To transfer the Receivables
accounting information to general ledger, run “General Ledger Transfer Program”.
Navigation: Receivables>
View Requests
We use this for
invoices from AUTO INVOICE PROGRAM
Journal Import:
1.
To transfer the data
from General Ledger Interface table to General Ledger,
2.
run the Journal Import
program from Oracle General Ledger.
3.
Navigation: General
Ledger > Journal> Import> Run
Back
end tables
GL_JE_BATCHES, GL_JE_HEADERS, GL_JE_LINES
Journal
Posting:
1.
We have to Post
journal batches that we have imported previously to update the account balances
in General Ledger.
2.
Navigation: General
Ledger> Journals > EnterQuery for the unposted journals for a specific
period
Back end tables
GL_BALANCES.
O2C Cycle (Process)
 Reviewed by oracle e-business Suite R12
on
October 05, 2019
Rating:
Reviewed by oracle e-business Suite R12
on
October 05, 2019
Rating:
Reviewed by oracle e-business Suite R12
on
October 05, 2019
Rating:


No comments: